You are here
Cisco 6500 VSS Domain ID and Virtual MAC Address
Submitted by admin on Thu, 12/20/2012 - 18:19
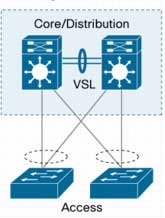
 Domain ID is one of the first parameter you come across when configuring Cisco Virtual Switching Systems (VSS). At first, it might appear that which value you choose is insignificant and you might even be able to use the same number among different VSS switch pairs. This is true as long as those VSS systems are not connected, whether directly or being Layer-2 adjacent, or the virtual MAC address is not implemented. Otherwise, you might find yourself having connectivity issue in your VSS implementation.
In this article, we reveal the cause of the issue when connecting two VSS systems that have identical domain ID and offer various options to rectify. Here, we assume that you have basic knowledge of Cisco VSS.
Background on Virtual MAC Address
By default, the VSS switches use MAC address pool from the first member switch that comes up, regardless of it being switch 1 or 2, and assign them to any layer 3 interfaces (eg. SVI, routed interface/port-channel). The MAC address pool is maintained across switch reboot as long as at least one switch stays up. However, when both switches go down and, for whatever reason, a different switch is powered up first, the MAC address pool will change, hence the MAC address on all layer 3 interfaces. Most end devices honor gratuitous ARP sent out by the switch and update their ARP table, in which case, will be able to maintain connectivity to their respective default gateway. However, any devices that ignore the gratuitous ARP may requires a clear on their ARP table or even reboot, which requires administrative intervention, and causes service disruption.
For this reason, Cisco recommends implementing virtual MAC address with the command “mac-address use-virtual”. This allows both switch 1 and 2 to always utilize the same pool of MAC address, which resolves the issue with MAC address being changed. The virtual MAC address pool is derived from the formula below (see Cisco IOS Virtual Switch Command Reference) and is within the range of 0008.e3ff.fc00 and 0008.e3ff.ffff.
"The MAC address range reserved for the VSS is derived from a reserved pool of addresses with the domain ID encoded in the leading 6 bits of the last octet and trailing 2 bits of the previous octet of the mac-address. The last two bits of the first octet is allocated for protocol mac-address which is derived by adding the protocol ID (0 to 3) to the router MAC address."
For example,
Domain ID 1 Virtual MAC Address = 0008.e3ff.fc04
Last two octets = fc04 = 111111(00.000001)00
Domain ID 2 Virtual MAC Address = 0008.e3ff.fc08
Problem:
You can see that the virtual MAC address is derived from a domain ID. For this reason, you will most likely run into issue when connecting two VSS systems that have identical domain ID as the switches will assign the same MAC address to an interface, see its own MAC address in the source of ARP request, and ignores the request as shown in the log message below. Therefore, they can never complete ARP resolution and fail to communicate.
Mar 04 18:13:12: IP ARP req filtered src 192.168.0.1 0008.e3ff.fc04, dst 192.168.0.2 0000.0000.0000 it's our address
This validates Cisco recommendation of using unique domain ID for each VSS implementation in the same environment. But if you have already found yourself in this situation, below are some of the options that you have.
Option 1: Change the Domain ID (with downtime)
The most obvious solution is to change the domain ID. Although this sounds simple, changing domain ID requires the whole VSS system to be reloaded (yes, that means both switch 1 and 2). If you are still staging the VSS or can afford approximately 10 minutes of downtime, this is probably the simplest solution with most predictable result. The following example shows commands to change a domain ID to 10.
|
!
VSS(config)#switch virtual domain 10
Domain ID 10 config will take effect only
after the exec command 'switch convert mode virtual' is issued
VSS#switch convert mode virtual
Virtual Domain ID change only, saving
the config and reloading the switch
Do you want to proceed? [yes/no]: yes
Building configuration...
[OK]
!
|
Solution 2: Stop using Virtual MAC Address (with downtime)
This can be done by removing “mac-address use-virtual” command. But since this will also cause both switches to reload and you can potentially run into issue mentioned previously with the gratuitous ARP, you might as well change the domain ID. This option is not recommended.
Solution 3: Hardcode MAC address per interface (without downtime)
You can try to change to a unique MAC address on an interface that is experiencing the conflict. This might be fine for a few interfaces but can become a hassle for larger number of interfaces. Although, this does not cause any downtime, you will need to keep these changes in mind and potentially apply same changes to any future interfaces.
Solution 4: Change the Domain ID (with minimal downtime)
If you have a strict requirement to limit the network interruption and would like to follow Cisco recommended configuration, assuming all connected devices are dual-homed, you can try the following steps (at your own risk).
1. Isolate Switch 1 (ie. remove linecard etc. including VSL and dual-active links). Network should be running off Switch 2.
2. Change the VSS domain ID on Switch 1 as described in option 1, to your desired value, and reboot.
3. During Switch 1 reboot, connect it back to the network (ie. re-insert linecards).
4. As Switch 1 becomes active again, isolate Switch 2. There might be network interruption while both switches are seen being active on the network.
5. Convert Switch 2 back to stand-alone mode using “switch convert mode stand-alone”, and reload.
6. Erase Switch 2 NVRAM using “erase nvram:”.
7. Perform steps as outlined in Replace Supervisor Module in Cisco Catalyst 6500 Virtual Switching System 1440
Summary (using Compact Flash)
a. Copy Switch 1 config to a Compact Flash
!
copy run disk0:VSS.cfg
!
b. Copy the config from Compact Flash to Switch 2 start-up config, and validate relevant VSS config
!
copy disk0:VSS.cfg startup-config
more nvram:startup-config
!
c. Set Switch 2 switch number
!
switch set switch_num 2 local
!
d. Reconnect VSL and Dual-Active Detection links and reload Switch 2 without saving running configuration
8. Once Switch 2 joins the VSS with correct domain ID, reconnect it back to the network.
9. You should now have your VSS system up and running fully with the new domain ID.
As you can see, changing VSS domain ID after putting a system in production requires either downtime or a long conversion procedure. Hopefully you are able to set it correctly at the beginning and save yourself from all these troubles.
References:


1 comments
Very nice and informative