You are here
Cisco Nexus 1000V VSM VEM Removal
Submitted by admin on Mon, 04/22/2013 - 20:56


 When it comes time to remove your Cisco Nexus 1000V, whether in production or lab environment, one of the most common mistakes is to delete VSM without disconnecting the VSM from the vCenter. If that is what you did, you will soon discover that your N1KV still sticks around under the Networking and vCenter does not allow you to remove it. Although, there is a way to fix this but it is rather a painful process involving re-creating a VSM and force it to use the old extension key so you can register and unregister properly. Needless to say, you would be better off doing it right the first time.
In this article, we walk you through step-by-step to completely remove both VSM and/or VEM in VMware. You will see that the process is, somewhat, a reverse of the installation.
Step 1: Migrate all vmNIC to vSwitch
The first thing you need to do is to vacate the dvSwitch. This includes moving all VMs and VMkernel off of the dvSwitch and back to traditional vSwitch.
For VM,
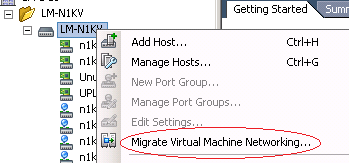
1. Under Networking, right click on the N1KV and select Migrate Virtual Machine Networking.
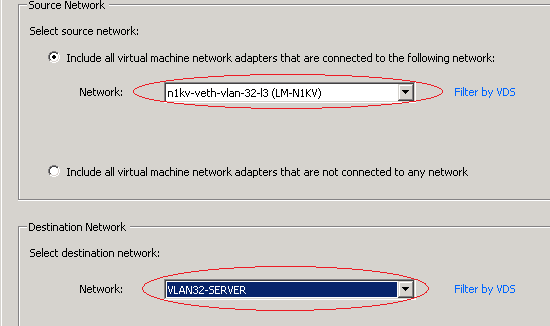
2. Select N1KV port-group that you want to migrate VM from (Source Network), and map it to vSwitch port-group that you want to migrate VM to (Destination Network).
3. Select all the VM you want to migrate.
4. Repeat 1-3 for each N1KV port-group until all VMs are migrated.
For VMkernel,
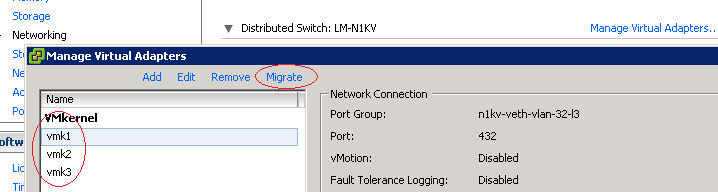
1. Go to the distributed vSwitch on an ESXi server and click on Manage Virtual Adapters.
2. Select a VMkernel you want and click Migrate.
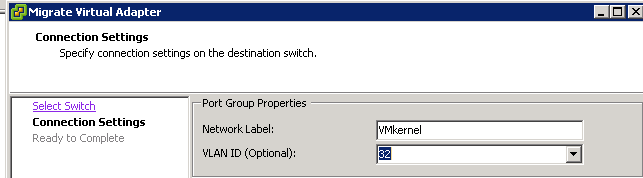
3. Change network label, if desired, and enter VLAN ID on vSwitch for the VMkernel to be on
4. Repeat 1-3 for each VMkernel until all of them are migrated.
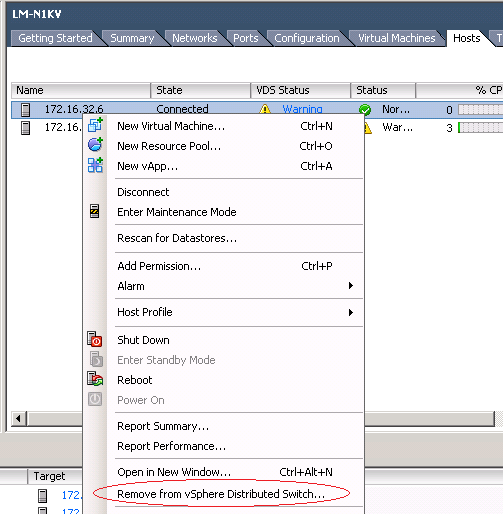
Step 2: Remove hosts from dvSwitch
Now that we do not have anything attached to the dvSwitch, we can remove the host.
1. Go to Networking and select your N1KV
2. Under Hosts tab, right click on an ESXi you want to remove and choose Remove from vSphere Distributed Switch
3. Repeat 1-2 until all servers are removed
Step 3: Uninstall VEM on ESXi
Now we need to remove the .vib that we initially installed.
1. Enable SSH on the ESXi host if not already
2. SSH to the ESXi and login
3. Enter ‘esxcli software vib remove’ command with correct version of VEM. If this is not known, enter ‘vem-remove –d’ and note the version. You may also want to specify ‘--maintenance-mode’ to avoid having to put the ESXi under maintenance mode. See below for sample outputs
|
~ # vem status
VEM modules are loaded
Switch Name Num Ports Used Ports Configured Ports MTU Uplinks
vSwitch0 128 4 64 1500 vmnic0
vSwitch1 128 6 64 1998 vmnic1
VEM Agent (vemdpa) is running
!
~ # vem-remove -d
Removing Cisco VEM VIB from visor system
Versions of ESX greater than 5.0.0 require the usage of
esxcli to remove Nexus 1000V package. Please use the command
found here to remove this package:
esxcli software vib remove -n cisco-vem-v152-esx
!
~ # esxcli software vib remove -n cisco-vem-v152-esx
[MaintenanceModeError]
MaintenanceMode is required to remove: [Cisco_bootbank_cisco-vem-v152-esx_4.2.1.2.1.1a.0-3.1.1]; install: [].
Please refer to the log file for more details.
!
~ # esxcli software vib remove --maintenance-mode -n cisco-vem-v152-esx
Removal Result
Message: Operation finished successfully.
Reboot Required: false
VIBs Installed:
VIBs Removed: Cisco_bootbank_cisco-vem-v152-esx_4.2.1.2.1.1a.0-3.1.1
VIBs Skipped:
!
~ # vem status
-sh: vem: not found
|
Step 4 (Optional): Delete VEM from VSM
If you are decommissioning an ESXi and want to reuse the same module number, delete the VEM on the VSM as follows.
1. Identify the module number
2. Delete the vem and associated uplink port-channel
|
! delete VEM
no vem <number>
! clean up port-channel
no interface port-channel <num>
!
|
Step 5: Disconnect VSM from vCenter (Important)
This is to make sure you do not end up with an orphan dvSwitch.
1. Enter the following commands
|
!
svs connect <name>
no vmware dvs
no connect
!
|
2. Verify that the dvSwitch is no longer present under Networking
Step 6: Delete .vib from ESXi (Optional)
If you manually installed the VEM and had to upload (SFTP) a .vib to the ESXi server, delete the file.
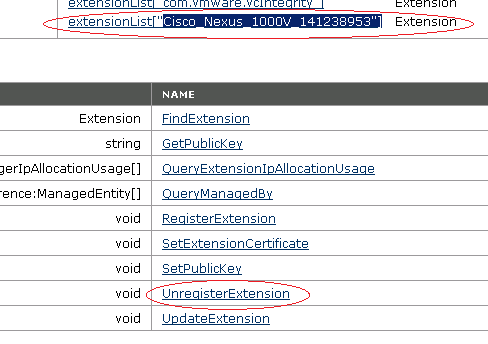
Step 7: Remove VSM Plug-in extension
These are the VSM .XML extension file that was registered to the vCenter during installation.
1. Go to https://<vCenter IP>/mob/?moid=ExtensionManager
2. Locate your N1KV extension
3. Down below, click on UnregisterExtension
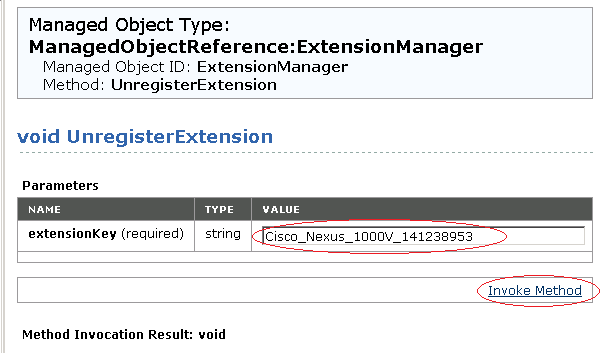
4. On the popup window, copy and paste the N1KV extension value and click Invoke Method
5. Refresh the browser and you should no longer see the extension
6. Exit vCenter and re-login. You should no longer see N1KV registered extension under Plug-in
Step 8: Disable SSH on ESXi (Optional)
Step 9: Delete VSM
You can now delete both primary and secondary VSM just like any other VM.
1. Shutdown the VM, if not already
2. To permanently delete the VSM, right click on the VM and choose Delete from disk
Step 10: Delete VMkernel Control interface (L3 Only)
If you installed the VEM and used a separate VMkernel for a Control interface, delete them on all ESXi
Step 11: Delete unused port-group on vSwitch
If you create dedicated VLAN on vSwitch for VSM Control/Management/Packet, delete them on all ESXi
Congratulation, your previous installation of Nexus 1000V has been removed. Your ESXi environment should now be ready for a fresh install if you choose to do so. Please note that the methods described in this article could be one of many alternatives to achieve the same result so if you know a more efficient ways of completing the same task, feel free to substitute them accordingly.
About Author
Metha Chiewanichakorn, CCIE#23585 (Ent. Infra, Sec, SP), is a Cisco networking enthusiast with years of experience in the industry. He is currently working as a consulting engineer for a Cisco partner. As a founder of and an instructor at labminutes.com, Metha enjoys learning and challenges himself with new technologies.